

How To Install SRAM Eagle 90 Mechanical Transmission
Prepare, hang and tighten. Setting up an Eagle Transmission Drivetrain is easy, but you have to do it a certain way as they are set up a bit differently to regular drivetrains. The Eagle 90 Mechanical Transmission drivetrain installation follows much the same steps as AXS Transmission drivetrains with just a few differences. This page and the embedded video will show you how to install Eagle 90.
Preparing the components ready for installation is a key step with all Transmission drivetrains including Eagle 90. Once you’ve prepared the components you can hang them on the bike. The next step is to tighten them correctly, it’s crucial to do this in the right order and to slacken off before the final tighten. Specific the Transmission Mechanical drivetrains the final step is to set up the cable. Follow the steps below to correctly install your Eagle 90 Mechanical Transmission drivetrain.
1Prepare:
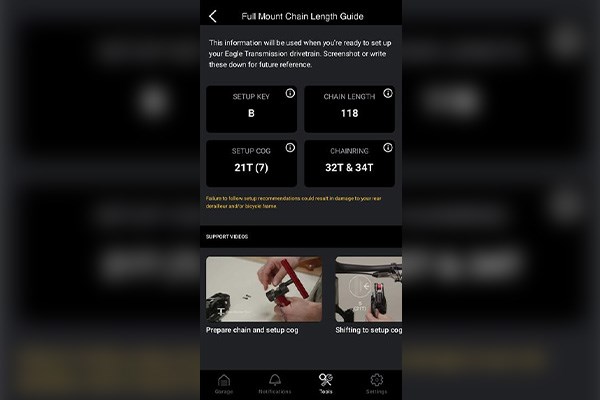
- Consult the SRAM AXS App or SRAM website to find out the Setup Key position, Setup Cog and Chain Length you need for your bike.
- Put the setup key on the derailleur in the correct position for your bike. The line on the Setup Key will line up with the letter A or B. If it’s not in the right position, remove the Key and reinsert it in the right position.
- Cut the T-Type chain to the right length for your bike as advised by the SRAM App.
- Attach the cranks to your bike in accordance with manufacturer instructions. Alternatively, attach the correct T-Type chainring to your existing cranks.
- Attach the new T-Type cassette to your wheel.
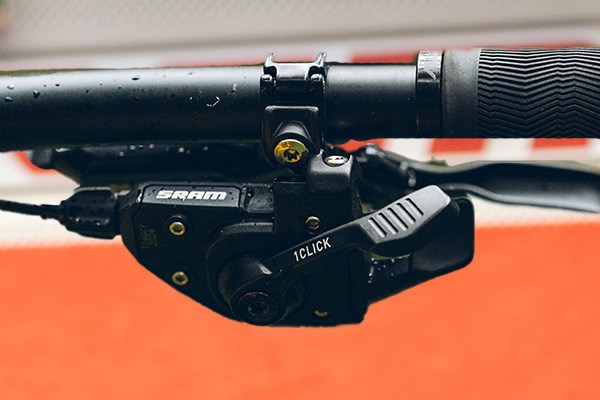
- Attach the shifter to your handlebars.
- Remove the Universal Derailleur Hanger from your frame and clean the interface. Note: for split pivot frames, take care with any additional washers on the pivot as these will need to be reinstalled when you hang the new Derailleur.
 Note: Choosing the correct chain length, setup key position & setup cog is essential.
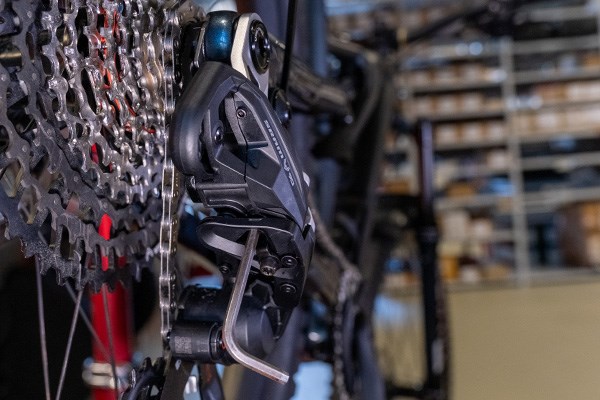
2Hang:
-
Derailleur
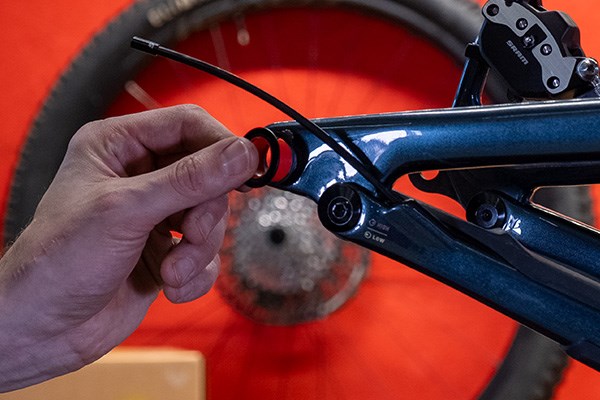
Insert the red bushing into the frame, pushing it in from the outside.
Put the derailleur up against the hangerless interface on your frame and insert the mount bolt.
Tighten the mount bolt with an 8mm allen key until it’s snug.
Untighten the bolt one full turn. The Silver Ring should be able to move freely at this point.
Rotate the derailleur cage forward and lock it in the fully open position. -
Rear Wheel
Put rear wheel in the frame and insert the axle.
Tighten the Axle until it’s snug.
Untighten the Axle one full turn.
-
Chain
Insert the chain in the derailleur. It’s easiest to use gravity to help you, with the derailleur locked in the fully open position just let the chain drop through from above.
As it’s a flat top chain, ensure that the flat part is facing up when the chain loops over the cassette and chain ring.
Close the chain with the Power Lock. This is flat top too, so make sure it’s in the same orientation as the chain.
Note: Remember to slacken the derailleur and axle bolts off one full turn when you mount them.
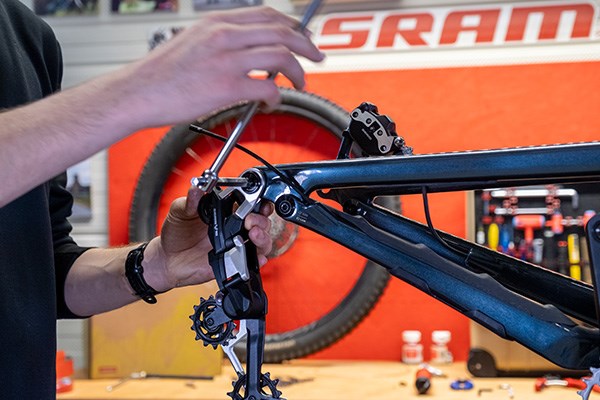
3Tighten:
-
Set the Derailleur
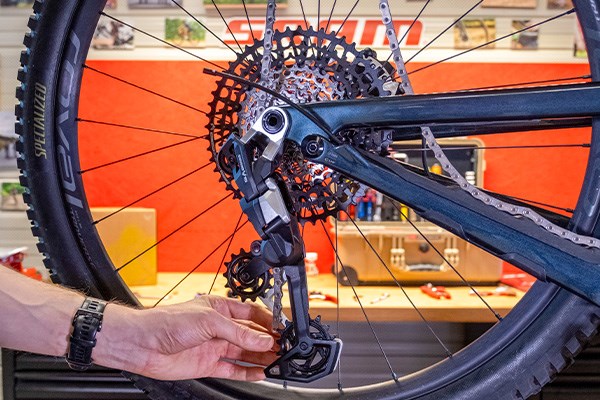
Set the derailleur in the second (setup) lock position.
Push the derailleur in and insert an allen key to lock it in the right position. This ensures that the chain moves over the correct setup cog for your bike (SRAM App).
- 4mm Allen Key – 7th Cog 21T
- 5mm Allen Key – 6th Cog 24T
-
Tighten the Derailleur
Stand towards the rear of the bike and pull back on the lower cage of the derailleur, so that the chain is taut.
Turn the cranks a few times to ensure that the chain is sitting properly on the desired cog.
Tighten the mount bolt (8mm allen key) to 35 Nm while continuing to pull the lower cage.
- If there is still slack on the chain after tightening the derailleur, loosen the bolt and repeat the steps above.
Ensure that the mark on the Silver Ring is aligned with the line on the full mount of the derailleur. If it’s not aligned, loosen the mount bolt, rotate the derailleur forward and repeat the steps above. -
Tighten the Rear Axle
Once the derailleur is tightened and correctly aligned, tighten the rear axle to the recommended torque.
Note: Ensure there is no slack in the chain and the mark on the silver ring lines up with the one on the full mount of the derailleur.
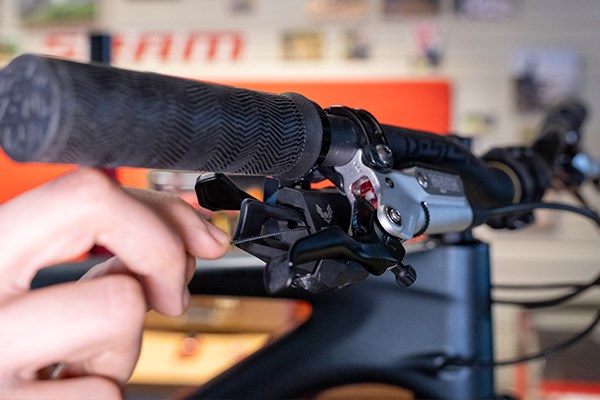
4Cable:
-
Route the Cable – Shifter
Set the shifter to the most outboard (hardest) gear. Click the small paddle on the shifter to move into the outboard (harder) gears.
Thread the shifter cable through the hole in the shifter and then through the cable housing with the aluminium end caps in place.
Make sure that the barrel adjuster on the shifter is wound all the way in, so you can tension the cable later. -
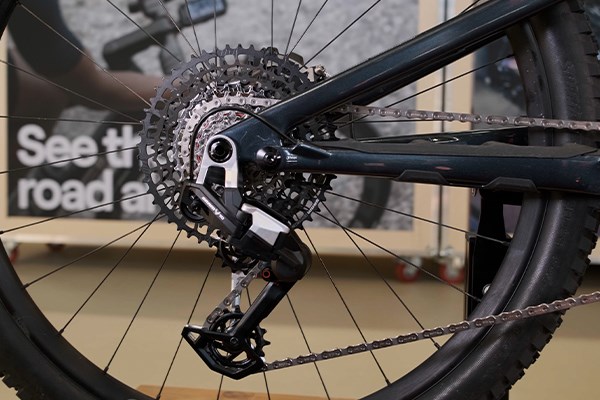
Route the Cable – Derailleur
Extend the derailleur cage back into the full lock position. Push the derailleur in slightly and remove the allen key you placed there earlier. Move the chain to the smallest cog on the cassette.
Route the cable through the pulley wheel at the top of the derailleur, around the shark fin, through the hole, then to the bolt. Ensure the cable runs along the groove in the washer under the bolt.
Tension the cable by hand and tighten the bolt with a T25 torx key.
-
Index the Gears
Release the lock on the cage to put the derailleur in ride mode.
Tension the cable using the barrel adjuster on the shifter to take up any slack.
Turn the cranks and press the large shifter paddle to move the derailleur inboard and shift the chain onto the next cog.
If the chain doesn’t shift, tension the cable a bit more using the barrel adjuster.
Shift up the gears one at a time, adjusting the tension with the barrel adjuster as required.
Once the gears are shifting smoothly all the way up and down the cassette, the gears are set.
Lastly, cut the cable, insert the ferrule (aka cable end cap) over the end of the cable, crimp it, then wedge the cable behind the retainer underneath the derailleur to keep it neatly out of the way.
Note: The gear cable may stretch a little over time, so you may need to tension the cable a little more after a number of rides to keep it shifting perfectly.
")